Previously, we’ve shared how to enable the Google Phone app’s new floating dialer bubble by modifying files on your Android device. Since then, our favorite Tasker plugin developer, João Dias, came up with a solution of his own using his AutoTools app to recreate the same floating bubble. His video is cool, but the accompanying post was slightly lacking in its description so I thought I would create a separate tutorial and improve on João’s design by adding visual feedback to the toggles in the Dialer Floating Bubble.
As always, we’ll first follow with a tutorial and then at the end you can find download links and instructions on importing the project.
Replicate Google Dialer’s Floating Bubble
AutoTools (Free+, Google Play) →
The AutoTools plugin comes with a new web-screen preset: floating bar. Using this preset, we can recreate the Google Dialer Floating Bubble on any phone. If you know your way around Tasker you will find it easy to recreate, but if you aren’t familiar with Tasker and AutoTools then read on as we’ll show you how.
The changes that I made include removing paths to the volume and microphone icons and replaced it with variables. I have done the same with commands for these options. This way we can create a visual toggle when the button has been pressed. It’s especially helpful with a mute option, so you could see if the microphone is enabled.


AutoTools Dialer Floating Bubble
Incoming call
 The profile becomes active when a call is answered. The AutoTool WebScreen: Floating bar preset is presented.
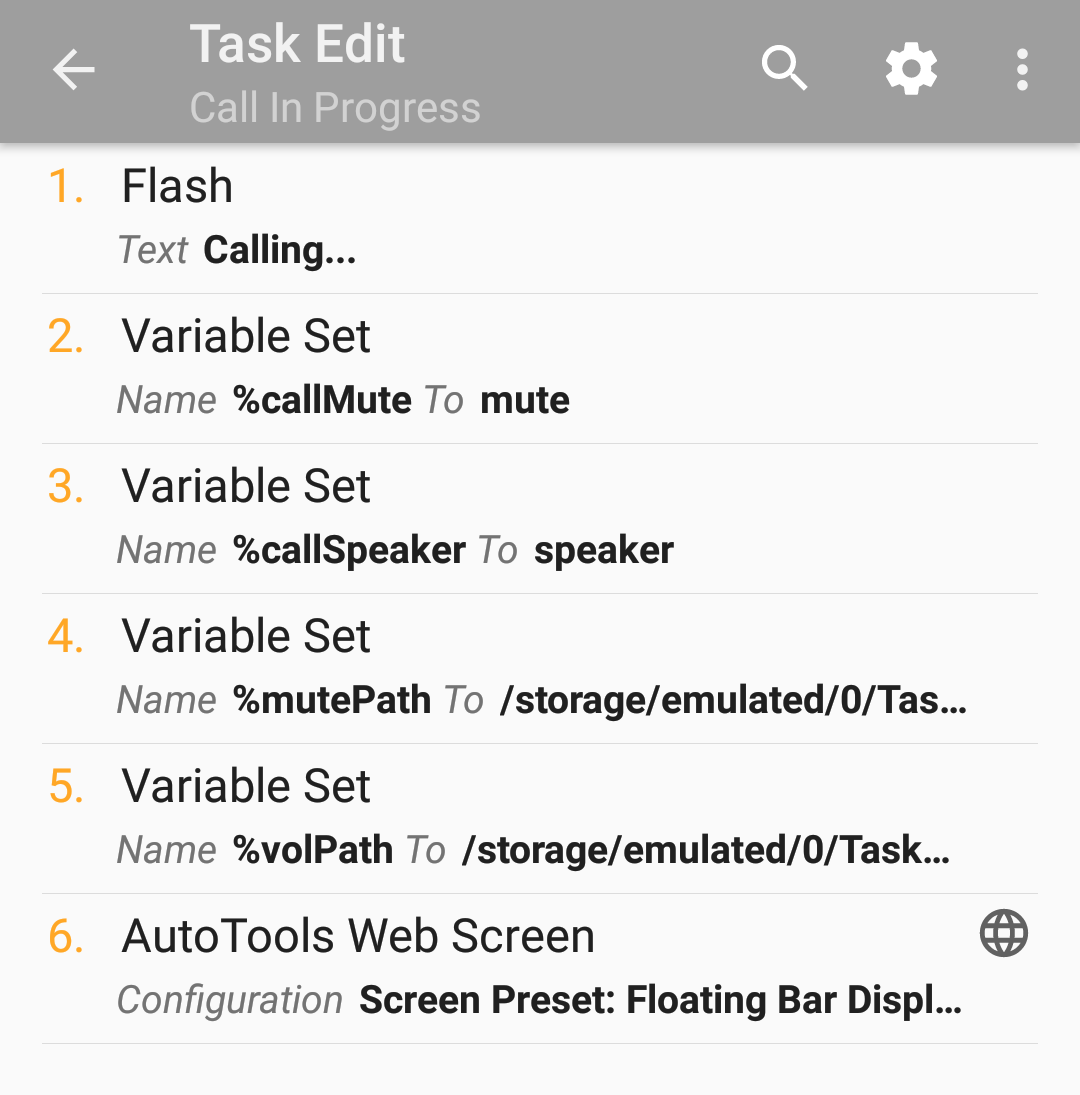
TASKER PROFILE - Call in Progress
Profile: Call In Progress
        Event: Phone Offhook
Enter: Call In Progress
        A1: Flash [ Text:Calling... Long:Off ]
        A2: Variable Set [ Name:%callMute To:mute
            Recurse Variables:Off Do Maths:Off Append:Off ]
        A3: Variable Set [ Name:%callSpeaker To:speaker
            Recurse Variables:Off Do Maths:Off Append:Off ]
        A4: Variable Set [ Name:%mutePath
            To:/pathto/micoff.png
            Recurse Variables:Off Do Maths:Off Append:Off ]
        A5: Variable Set [ Name:%volPath
            To:/pathto/voloff.png
            Recurse Variables:Off Do Maths:Off Append:Off ]
        A6: AutoTools Web Screen [ Configuration:Screen Preset: Floating Bar
                Display Mode: Overlay
                Close Overlay ID: call ui
                Source: /pathto/page.html
                Toast Duration: 5000
                Background Color: #00FFEBEE
                Width: 75
                Height: 75
                Gravity: Left
                Offset X: 50
                Offset Y: -100
                Animation: Zoom In
                Overlay Id: call ui
                Show Duration: 500
                Hide Duration: 250
                Drag: Draggable Anywhere
                Drag Movements: All Directions
                Fling To Dismiss: No Fling To Dismiss
                Update: true
                Icons: %volPath,%mutePath,
                        /pathto/endcall.png,
                Commands: %callSpeaker,%callMute,end
                Command Prefix: phonecall
                Visible Items: 3
                First Items: 3,4,2,5
                Item Padding: 24
                Animation Time: 400
                Circle When Collapsed: true
                Custom Expand Icon:
                        /pathto/call.png
                Snap To Items: true
                Floating Bar Color: #1565C0
                Expander Color: black
                Expander Back Color: #0D47A1 Timeout (Seconds):30 ]
Instead of predefined paths to the microphone and volumes and their respective commands, I’m using variables %mutePath and %volPath. These will change later depending on what command has been issued.
The %callMute and %callSpeaker hold an actual command that is assigned to the existing buttons. The command will change when a button is pressed, and the Dialer Floating Bubble will display a correct icon.
Creating (or modifying this bubble if you used Joao’s tutorial ) is a bit painful, but the good news is we can just copy and paste this action later. Make sure to assign the WebScreen ID as we will need this later to cancel the bubble.
Call ended
 It’s triggered by the command: phonecall=:=end and runs the task Call Ended. Use AutoTools WebScreen in display mode close. Use the same WebScreen ID as in Incoming call profile.

TASKER PROFILE - Call Ended
Profile: Call Ended
        Event: Phone Idle
Enter: Call Ended
        A1: Flash [ Text:Call ended.... Long:Off ]
        A2: AutoTools Web Screen [ Configuration:Display Mode: Close
                Close Overlay ID: call ui
                Toast Duration: 5000
                Height: 400
                Gravity: Center
                Animation: Slide In From Top
                Show Duration: 500
                Hide Duration: 250 Timeout (Seconds):30 ]
Commands


This profile controls all actions sent by the Dialer Floating Bubble. Each trigger starts with a prefix phonecall=:= and triggers one of the toggles/actions depending on the input intercepted.
TASKER PROFILE - Call Commands
Profile: Call Commands
        Event: AutoApps Command [ Configuration:Command Filter: phonecall=:=
Variable Names: command ]
Enter: Call Commands
        A1: If [ %command ~ *speaker ]
                A2: Variable Set [ Name:%callSpeaker To:unspeaker
                        Recurse Variables:Off Do Maths:Off Append:Off ]
                        If [ %command ~ speaker ]
                A3: Variable Set [ Name:%volPath To:/pathto/volon.png
                        Recurse Variables:Off Do Maths:Off Append:Off ]
                        If [ %command ~ speaker ]
                A4: Variable Set [ Name:%callSpeaker To:speaker
                        Recurse Variables:Off Do Maths:Off Append:Off ]
                        If [ %command ~ unspeaker ]
                A5: Variable Set [ Name:%volPath To:/pathto/voloff.png
                        Recurse Variables:Off Do Maths:Off Append:Off ]
                        If [ %command ~ unspeaker ]
                A6: AutoTools Web Screen
                        [Floating Bar - the same as in Call in Progress ]
                A7: Speakerphone [ Set:Toggle ]
        A8: Else If [ %command ~ *mute ]
                A9: Variable Set [ Name:%callMute To:mute
                        Recurse Variables:Off Do Maths:Off Append:Off ]
                        If [ %command ~ unmute ]
                A10: Variable Set [ Name:%mutePath To:/pathto/micoff.png
                        Recurse Variables:Off Do Maths:Off Append:Off ]
                        If [ %command ~ unmute ]
                A11: Variable Set [ Name:%callMute To:unmute
                        Recurse Variables:Off Do Maths:Off Append:Off ]
                        If [ %command ~ mute ]
                A12: Variable Set [ Name:%mutePath To:/pathto/micon.png
                        Recurse Variables:Off Do Maths:Off Append:Off ]
                        If [ %command ~ mute ]
                A13: AutoTools Web Screen
                        [Floating Bar - the same as in Call in Progress ]
                A14: Mic Mute [ Set:Toggle ]
        A15: Else If [ %command ~ end ]
                A16: End Call
        A17: End If
I know the description looks daunting at first, but this is the same set of actions repeated twice. When mute or speaker is pressed, we have to create an alternative WebScreen with opposite icon and command displayed to the user.
A1,A8
If the command = speaker/mute a set of actions will follow. I hacked the commands a little to make it easier to process all the actions. We are capturing mute/unmute and speaker/unspeaker commands by these actions. This is why I’m using the * wildcard in the IF condition.
A2,A4 and A9,A11
Depending on the command issued (mute/unmute|speaker/unspeaker) I set a correct command that will be assigned the next time I press the toggle. For example, if I press the button to mute (command=:=mute), I want to update the WebScreen and make sure that the next time I press this button the call will be unmuted (command=:=unmute). The same goes for the speaker action.
A3,A5 and A10,A12
In a similar fashion, I want to make sure that paths to the respective icons are changed once the button is issued. If I press a mute icon, I want the unmute icon to be substituted, therefore a path has to be updated.
A15
If the command reads end—just end the call.
A7,A14
Simply use actions mute and speaker to toggle the settings.
Conclusion and Download
Now you know how to do this with Tasker and AutoTools. The new Dialer Floating Bubble project provides you with a nice, visual feedback to make interacting with your phone while in a phone call just a little bit easier. Feel free to further modify this Tasker project.
Download the Tasker Dialer Floating Button Project
Download the above ZIP file and extract the contents onto the internal storage of your Android device. Extract the folder callui to the Tasker/icons directory. Open up Tasker and disable “Beginner Mode” in Preferences. Then, go back to Tasker’s main page and long-press on the home icon in the bottom left corner. You will see an option to “import” a project. Tap that option then find the .prj.xml file you extracted earlier. Once imported, you will see a new tab at the bottom alongside the default home icon in Tasker. This contains the profiles and tasks of this helper project.
Follow the XDA-Developers Tutorials feed for more posts such as this. Also, check out our Tasker Tips & Tricks forum for the latest creations among the automation enthusiasts in our community.
from HB APK | News,Android,Apps,Games,Technology and more... http://apk.highbroadcast.com/2017/10/replicate-google-dialers-floating.html


0 comments:
Objavi komentar